Thursday, May 28, 2009

The Splinter

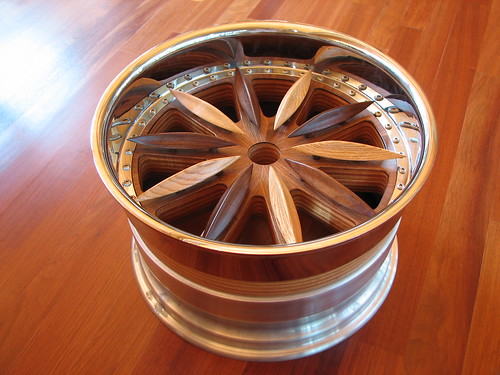
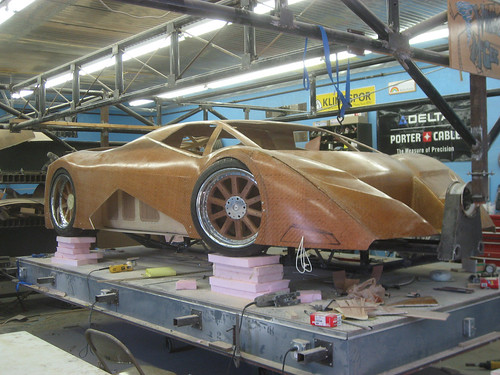
There's this graduate design student down in North Carolina who's building a car entirely out of wood for a graduate project. Not just 'a car' though, a mid-engine supercar. His name is Joe Harmon and I have found myself obsessing over his project. At my work there's a handful of websites that I frequently use as time wasters, and joeharmondesign.com is near the top of the list. The fact that he's building the entire car out of wood aside, his website, blog, and flicker pages are incredible, and definitely worth a browse. Check it out.


Just a few details that I find fascinating:
  1. The body panels are made from woven strips of cherry. They built an old school loom to weave the strips of 1/8th inch cherry veneer that they cut with a homemade veneer slicer.
  2. The leaf springs are made from laminated osage orange.
  3. The engine is a twin-supercharged Cadillac Northstar, and to reduce heat in the engine compartment they flipped the heads over so the intakes are on the sides of the engine and the exhaust is routed out the top.
I'm not certain what the state of the car is right now, except that they don't seem to be working on it at the moment. I have seen pictures of it at shows and what not, so I know that it is at least assembled, but I don't think they actually have it running.

Tuesday, May 26, 2009

Will This Work?

Calling all people smarter than me...

This weekend I should be able to start working on the doors and drawer panels for my cabinets. I'm building bridal jointed frames with a flat panel. I want to use plywood for the panel, because I can match the grain of all the panels and don't have to resaw a ton of wood. Rather than cutting a groove and capturing the panel however, I'm wondering if I can rabbett the panel into the frame. See crappy sketch below.

I actually only want to do this on the drawer fronts, the doors will have a glass panel. The reason I want to do this is two-fold. First, it's quick. The frames can be rabbetted after they're glued up which also simplifies the glue up. Two, it makes the back of the assembled frame and panel flush, which makes it easier to screw it to the drawer box. It won't look as nice from behind as a frame and captured panel for sure, but once the frames are screwed to the drawer boxes the back side of the panel won't even be seen.

Here's what I don't know though: can I glue a plywood panel into the solid frame, or will it eventually bust out from wood movement? Essentially this is the exact same process that we've all done to assemble a back panel into a solid cabinet, so I think it would work, but I don't think I've ever seen it done this way.

What's everyone think??

Sunday, May 17, 2009

Pete's Digs

I just got back last night from a week in New York. The guy who was the other resident at the Inside Passage while I was there, Pete Heilman, owns a large co-op shop in Brooklyn and last September I had a chance to check it out while I was out for Pete & Maura's wedding. Unfortunately though I was only out there for a few days, so when a seat sale came up last January I snapped up some cheap tickets and spent this past week hanging out, sight seeing, eating, etc.

Pete is in the very enviable position of living in a city where there is a built-in clientele for custom woodworking. New York City, particularly Manhattan, seems somewhat insulated from the economic trouble of the rest of the United States. Pete owns a 5000 square foot shop in an 'up and coming' area of Brooklyn, where he rents out space to other woodworkers as well cranks out various custom commissions with his own business, Heilman Design.


The morning I was there the guys were just loading a completed project in a van. Everyone was busy working on something so I just wandered around snapping pics.

Pete has been working for months on a cabinet to house medical journals. He's been picking away at it between other work. It looks to be near completion.


Pete recently moved his personal area upstairs - to be closer to the ping pong table maybe? While the bulk of the machine work goes on in the machine room downstairs, he moved a mini-max five-in-one upstairs as well. It's a nice little machine, and eliminates the need for him to run up and down the stairs for incidental machine work.


The machine room downstairs has all the usual stuff plus a 12" jointer, 10" cabinet saw, and two big sliding tablesaws.


The big daddy Northfield jointer got a complete re-haul when it showed up at the shop, and purrs like a kitten now. Pete said that blade changes are a real source of frustration though. I like the ship-wheel depth adjustment.


The front of the building is currently getting a sharp new facade made of Sapele and glass.

Friday, April 24, 2009

Good Slides = $$$$$$

I'm finally back to work on my base cabinets after a few weeks of flooring work. It's going well, and I should be able to start installation this weekend. This past week I had to sort out some drawer slide issues.

On the advice of Paul Gort I got an account with the Montreal hardware dealer Richelieu and ordered all my hinges through them. I bought Blum hinges with the optional 'Blumotion' clips, which adds a soft-close feature. It was worth the trouble of setting up an account and ordering online because the hinges were about half the price than I could find locally (about a third of Lee Valley!!). Drawer slides caused some grief though. I wanted the same soft-close feature but Blum Tandem slides with the optional Blumotion clips were $35 a pair. Including my pantry I have 30 drawers. That's $1050 in slides alone, more than the entire materials bill!

After some hunting around I found some ball bearing slides with a soft close feature at Lee Valley. At $13 a pair they seemed like a more economical choice.

Lee Valley didn't have a set of these on display unfortunately so I couldn't see how they worked. After purchasing them I saw that they didn't work worth a shit. The mechanism that creates the soft close is basically a spring that engages the slide once it gets close, and a small oil shock stops the spring from slamming the slide home. Unfortunately the spring didn't engage the slide everytime, sometimes it just bounced off the little clip. And when it did engage properly the spring didn't always pull the slide all the way home, leaving the drawer sticking out about 1/4". I mocked up a quick drawer and drawer pocket just to confirm my suspicions. Yup, turns out they suck.

I was at PJ White last week and saw that they had Hettich soft close slides on sale. I played around with the little mock up drawer they had on display and they worked beautifully, opening easily and closing perfectly every time.


Like the Blum slides, Hettich has a unique way of attaching the slide to the actual drawer. The slides themselves don't come apart, instead a hole in the back of the drawer engages a small pin in the back of the slide and the front clips to the bottom of the drawer with a set of plastic clips. The entire slides are hidden under the drawer which means the weight of the drawer rests entirely on the slide, rather than on a couple screws like side mount slides.

At $26 a pair they were twice the price of the shitty Lee Valley slides but $10 cheaper than the Blum slides. I think I'll still build a drawer mockup, just to make sure I don't mess up the actual drawers.

Tuesday, March 10, 2009

Gimmee Gimmee Gimmee...

The economy in the US is in such shambles there's a ton of deals on woodworking/metalworking equipment as more and more factories and shops close their doors. If shipping didn't cost so damned much I'd be buying machines left and right. Check out this bad-ass boring machine for $1000. Put an XY table on it and you'd have the mother of all mortising machines.

Sunday, March 8, 2009

Quickie

Not much progress to report on for this weekend's work. I actually had to plow snow in my yard most of the day today, the weather here has been crazy. I finally had to do something when a drift ate my truck this morning.


I love these little right angle clamp fixtures. They're far cheaper than a dedicated edge clamp and they work great in places where either a bar clamp can't reach or there isn't a parallel side to clamp to, like this 45 degree edge on my microwave shelf. Which, speak of the devil, is done.


As previously mentioned, now that my wall cabinets are complete I'm switching gears for couple weeks before I dive into the base cabinets.

Till then...

Sunday, March 1, 2009

Well Hung

I finally got my wall cabinets hung this weekend, minus the microwave cabinet - which I haven't built yet. Hanging the cabinets wasn't as simple as I thought it would be. My house is 120 years old and isn't very square, plumb, or level. Therefore each cabinet had to be scribed and fit to the wall. The first cabinet I hung took me a loooong time and didn't end up fitting very well (although I'm sure I'll be the only one who ever notices) but as I worked away it got quicker and I became very ninja like.


This cabinet is the one above the fridge, and has a finished side that fits tight to the wall and flush to the door on the front. It gives the door a bit more room to swing open before hitting the wall. I measured the inside corner of my walls with a bevel gauge and transferred that angle to the cabinet. You can see how out of square the walls were. I intended to use my belt sander to remove the material but once I had it scribed and saw how much sanding there would be, I took the piece off and used my bandsaw. Resawing 12" of plywood on the bandsaw was no fun and completely did in a new blade. Sorry, I didn't take an 'after' shot.


Here's my sweet set up for holding the cabinets in place while scribing - a shitty wood box on a ladder. Textbook! This is my 'blind corner' which hides the transformer for the undercabinet lights. The wall that this cabinet is mounted to is a tad out of plumb so after getting it mounted I had to scribe and sand the corner piece so it would fit tight against the other cabinet.


Over the 36" height of the cabinet this totalled about 3/16" of difference top to bottom.


After scribing the plumb line I removed the bulk of the waste with a belt sander. I 'heart' my belt sander.


Once I had it close to the line I switched to a jointer plane to ensure it was straight. It always seems kinda blasphemous to handplane plywood, like farting in church. Well, I've never actually been to church... or farted.

It's nice to have these on the wall and out of the way. Space is at a bit of a premium it seems. I'll try to get the microwave cabinet (which is going to the left of the window) put together this week and then I'm going to take a break from cabinets to get some other stuff done in the house.